Spring Boot Security Role-based Authorization Tutorial
- Details
- Written by Nam Ha Minh
- Last Updated on 26 May 2024 | Print Email
Username | Roles |
patrick |
USER
|
alex
|
CREATOR |
john |
EDITOR
|
namhm
|
CREATOR, EDITOR |
admin
|
ADMIN |
1. Design and Create Tables
For role-based authorization with credentials and authorities stored in database, we have to create the following 3 tables: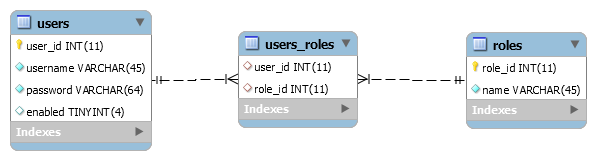 The users table stores credentials and the roles table stores authorities (rights). The entity relationship between users and roles is many-to-many because a user can have one or more roles and a role can be assigned to be one or more users. That’s why we need to have the intermediate table users_roles to realize that many-to-many association.You can execute the following MySQL script to create these tables:
CREATE TABLE `users` (
  `user_id` int(11) NOT NULL AUTO_INCREMENT,
  `email` varchar(45) NOT NULL,
  `full_name` varchar(45) NOT NULL,
  `password` varchar(64) NOT NULL,
  `enabled` tinyint(4) DEFAULT NULL,
  PRIMARY KEY (`id`),
  UNIQUE KEY `email_UNIQUE` (`email`)
);

CREATE TABLE `roles` (
  `role_id` int(11) NOT NULL AUTO_INCREMENT,
  `name` varchar(45) NOT NULL,
  PRIMARY KEY (`id`)
);

CREATE TABLE `users_roles` (
  `user_id` int(11) NOT NULL,
  `role_id` int(11) NOT NULL,
  KEY `user_fk_idx` (`user_id`),
  KEY `role_fk_idx` (`role_id`),
  CONSTRAINT `role_fk` FOREIGN KEY (`role_id`) REFERENCES `roles` (`role_id`),
  CONSTRAINT `user_fk` FOREIGN KEY (`user_id`) REFERENCES `users` (`user_id`)
);
INSERT INTO `roles` (`name`) VALUES ('USER');
INSERT INTO `roles` (`name`) VALUES ('CREATOR');
INSERT INTO `roles` (`name`) VALUES ('EDITOR');
INSERT INTO `roles` (`name`) VALUES ('ADMIN');
Run the following SQL statements to create 5 users in the users table:INSERT INTO `users` (`username`, `password`, `enabled`) VALUES ('patrick', '$2a$10$cTUErxQqYVyU2qmQGIktpup5chLEdhD2zpzNEyYqmxrHHJbSNDOG.', '1');
INSERT INTO `users` (`username`, `password`, `enabled`) VALUES ('alex', '$2a$10$.tP2OH3dEG0zms7vek4ated5AiQ.EGkncii0OpCcGq4bckS9NOULu', '1');
INSERT INTO `users` (`username`, `password`, `enabled`) VALUES ('john', '$2a$10$E2UPv7arXmp3q0LzVzCBNeb4B4AtbTAGjkefVDnSztOwE7Gix6kea', '1');
INSERT INTO `users` (`username`, `password`, `enabled`) VALUES ('namhm', '$2a$10$GQT8bfLMaLYwlyUysnGwDu6HMB5G.tin5MKT/uduv2Nez0.DmhnOq', '1');
INSERT INTO `users` (`username`, `password`, `enabled`) VALUES ('admin', '$2a$10$IqTJTjn39IU5.7sSCDQxzu3xug6z/LPU6IF0azE/8CkHCwYEnwBX.', '1');Note that the passwords are encoded in BCrypt format and same as usernames.And execute the following script to assign permissions to users based on the table above:INSERT INTO `users_roles` (`user_id`, `role_id`) VALUES (1, 1); -- user patrick has role USER INSERT INTO `users_roles` (`user_id`, `role_id`) VALUES (2, 2); -- user alex has role CREATOR INSERT INTO `users_roles` (`user_id`, `role_id`) VALUES (3, 3); -- user john has role EDITOR INSERT INTO `users_roles` (`user_id`, `role_id`) VALUES (4, 2); -- user namhm has role CREATOR INSERT INTO `users_roles` (`user_id`, `role_id`) VALUES (4, 3); -- user namhm has role EDITOR INSERT INTO `users_roles` (`user_id`, `role_id`) VALUES (5, 4); -- user admin has role ADMINSo that’s the setup for the database.
2. Configure Data Source Properties
To use Spring Boot with Spring Data JPA and Hibernate, configure database connection information in the application.properties as follows:spring.jpa.hibernate.ddl-auto=none spring.datasource.url=jdbc:mysql://localhost:3306/sales spring.datasource.username=root spring.datasource.password=passwordModify URL, username and password matching your MySQL database.
3. Configure Dependencies
Make sure that the Maven build file includes the following dependency declaration for Spring Web, Spring Data JPA, Spring Security, Thymeleaf, MySQL JDBC driver and Thymeleaf extras for Spring Security:<dependency> <groupId>org.springframework.boot</groupId> <artifactId>spring-boot-starter-data-jpa</artifactId> </dependency> <dependency> <groupId>org.springframework.boot</groupId> <artifactId>spring-boot-starter-security</artifactId> </dependency> <dependency> <groupId>org.springframework.boot</groupId> <artifactId>spring-boot-starter-thymeleaf</artifactId> </dependency> <dependency> <groupId>org.springframework.boot</groupId> <artifactId>spring-boot-starter-web</artifactId> </dependency> <dependency> <groupId>com.mysql</groupId> <artifactId>mysql-connector-j</artifactId> <scope>runtime</scope> </dependency> <dependency> <groupId>org.thymeleaf.extras</groupId> <artifactId>thymeleaf-extras-springsecurity6</artifactId> </dependency>Note that by default, if the Spring Security library present in the classpath, the users must login to use the application.
4. Code Entity Classes
Next, we need to create two entity classes that map with the tables users and roles in the database. The first class is Role:package net.codejava;
import jakarta.persistence.*;
@Entity
@Table(name = "roles")
public class Role {
@Id
@Column(name = "role_id")
@GeneratedValue(strategy = GenerationType.IDENTITY)
private Integer id;
private String name;
public Integer getId() {
return id;
}
// remaining getters and setters
}The second class is User:package net.codejava;
import java.util.*;
import jakarta.persistence.*;
@Entity
@Table(name = "users")
public class User {
@Id
@Column(name = "user_id")
@GeneratedValue(strategy = GenerationType.IDENTITY)
private Long id;
private String username;
private String password;
private boolean enabled;
@ManyToMany(cascade = CascadeType.ALL, fetch = FetchType.EAGER)
@JoinTable(
name = "users_roles",
joinColumns = @JoinColumn(name = "user_id"),
inverseJoinColumns = @JoinColumn(name = "role_id")
)
private Set<Role> roles = new HashSet<>();
public Long getId() {
return id;
}
// remaining getters and setters are not shown for brevity
}Here, you can see we use a Set of Roles in the User class to map a unidirectional many-to-many association from User to Role, e.g. user.roles. Refer to this tutorial for details about Hibernate many-to-many relationship mapping. 5. Code UserRepository
Next, create the UserRepository interface with the following code:package net.codejava;
import org.springframework.data.jpa.repository.Query;
import org.springframework.data.repository.CrudRepository;
import org.springframework.data.repository.query.Param;
public interface UserRepository extends CrudRepository<User, Long> {
@Query("SELECT u FROM User u WHERE u.username = :username")
public User getUserByUsername(@Param("username") String username);
}This interface is a subtype of CrudRepository defined by Spring Data JPA so Spring will generate implementation class at runtime. We define the getUserByUsername() method annotated by a JPA query to be used by Spring Security for authentication. If you’re new to Spring Data JPA, kind check this quick start guide. 
Spring Boot E-Commerce Ultimate Course
Code Real-life Shopping Website with Java and Spring Boot. Full-stack Development. Hands-on Practices. Job-ready Skills.
6. Implement UserDetails and UserDetaisService
Spring Security requires an implementation of UserDetails interface to know about the authenticated user information, so we create the MyUserDetails class as follows:package net.codejava;
import java.util.*;
import org.springframework.security.core.GrantedAuthority;
import org.springframework.security.core.authority.SimpleGrantedAuthority;
import org.springframework.security.core.userdetails.UserDetails;
public class MyUserDetails implements UserDetails {
private User user;
public MyUserDetails(User user) {
this.user = user;
}
@Override
public Collection<? extends GrantedAuthority> getAuthorities() {
	Set<Role> roles = user.getRoles();
	List<SimpleGrantedAuthority> authorities = new ArrayList<>();

	for (Role role : roles) {
		authorities.add(new SimpleGrantedAuthority(role.getName()));
	}

	return authorities;
}
@Override
public String getPassword() {
return user.getPassword();
}
@Override
public String getUsername() {
return user.getUsername();
}
@Override
public boolean isAccountNonExpired() {
return true;
}
@Override
public boolean isAccountNonLocked() {
return true;
}
@Override
public boolean isCredentialsNonExpired() {
return true;
}
@Override
public boolean isEnabled() {
return user.isEnabled();
}
}You can see, this class wraps an instance of User class and delegates almost overriding methods to the User’s ones. For authorization, pay attention to this method:@Override
public Collection<? extends GrantedAuthority> getAuthorities() {
Set<Role> roles = user.getRoles();
List<SimpleGrantedAuthority> authorities = new ArrayList<>();
for (Role role : roles) {
authorities.add(new SimpleGrantedAuthority(role.getName()));
}
return authorities;
}This method returns a set of roles (authorities) to be used by Spring Security in the authorization process.Next, we need to code an implementation of the UserDetailsService interface defined by Spring Security with the following code:package net.codejava;
import org.springframework.beans.factory.annotation.Autowired;
import org.springframework.security.core.userdetails.*;
public class UserDetailsServiceImpl implements UserDetailsService {
@Autowired
private UserRepository userRepository;
@Override
public UserDetails loadUserByUsername(String username)
throws UsernameNotFoundException {
User user = userRepository.getUserByUsername(username);
if (user == null) {
throw new UsernameNotFoundException("Could not find user");
}
return new MyUserDetails(user);
}
}As you can see, this class makes use an instance of UserRepository interface in the loadUserByUsername() method which will be invoked by Spring Security when authenticating the users. 7. Configure Spring Security Authentication & Authorization
And to connect all the pieces together, we code a Spring Security configuration class with the following code:package net.codejava;
import org.springframework.context.annotation.*;
import org.springframework.security.authentication.dao.*;
import org.springframework.security.config.annotation.authentication.builders.*;
import org.springframework.security.config.annotation.web.builders.HttpSecurity;
import org.springframework.security.config.annotation.web.configuration.*;
import org.springframework.security.core.userdetails.UserDetailsService;
import org.springframework.security.crypto.bcrypt.BCryptPasswordEncoder;
@Configuration
@EnableWebSecurity
public class WebSecurityConfig extends WebSecurityConfigurerAdapter {
@Bean
public UserDetailsService userDetailsService() {
return new UserDetailsServiceImpl();
}
@Bean
public BCryptPasswordEncoder passwordEncoder() {
return new BCryptPasswordEncoder();
}
@Bean
public DaoAuthenticationProvider authenticationProvider() {
DaoAuthenticationProvider authProvider = new DaoAuthenticationProvider();
authProvider.setUserDetailsService(userDetailsService());
authProvider.setPasswordEncoder(passwordEncoder());
return authProvider;
}
@Override
protected void configure(AuthenticationManagerBuilder auth) throws Exception {
auth.authenticationProvider(authenticationProvider());
}
@Override
protected void configure(HttpSecurity http) throws Exception {
http.authorizeRequests()
.antMatchers("/").hasAnyAuthority("USER", "CREATOR", "EDITOR", "ADMIN")
.antMatchers("/new").hasAnyAuthority("ADMIN", "CREATOR")
.antMatchers("/edit/**").hasAnyAuthority("ADMIN", "EDITOR")
.antMatchers("/delete/**").hasAuthority("ADMIN")
.anyRequest().authenticated()
.and()
.formLogin().permitAll()
.and()
.logout().permitAll()
.and()
.exceptionHandling().accessDeniedPage("/403")
;
}
}The first 4 methods are needed to configure an authentication provider that uses Spring Data JPA and Hibernate. And in the last method we configure HTTP Security for authentication and authorization. We also configure a custom URL for displaying access denied error in case the users do not have permission.UPDATE: With Spring Boot 3.x and Spring Security 6.x, code of the security configuration class should be as follows:package net.codejava;
import org.springframework.context.annotation.Bean;
import org.springframework.context.annotation.Configuration;
import org.springframework.security.authentication.dao.DaoAuthenticationProvider;
import org.springframework.security.config.annotation.web.builders.HttpSecurity;
import org.springframework.security.core.userdetails.UserDetailsService;
import org.springframework.security.crypto.bcrypt.BCryptPasswordEncoder;
import org.springframework.security.web.SecurityFilterChain;
@Configuration
public class WebSecurityConfig {
@Bean
UserDetailsService userDetailsService() {
return new UserDetailsServiceImpl();
}
@Bean
BCryptPasswordEncoder passwordEncoder() {
return new BCryptPasswordEncoder();
}
@Bean
DaoAuthenticationProvider authenticationProvider() {
DaoAuthenticationProvider authProvider = new DaoAuthenticationProvider();
authProvider.setUserDetailsService(userDetailsService());
authProvider.setPasswordEncoder(passwordEncoder());
return authProvider;
}
@Bean
SecurityFilterChain configure(HttpSecurity http) throws Exception {
http.authorizeHttpRequests(auth -> auth
.requestMatchers("/").hasAnyAuthority("USER", "CREATOR", "EDITOR", "ADMIN")
.requestMatchers("/new").hasAnyAuthority("ADMIN", "CREATOR")
.requestMatchers("/edit/**").hasAnyAuthority("ADMIN", "EDITOR")
.requestMatchers("/delete/**").hasAuthority("ADMIN")
.anyRequest().authenticated()
)
.formLogin(login -> login.permitAll())
.logout(logout -> logout.permitAll())
.exceptionHandling(eh -> eh.accessDeniedPage("/403"))
;
return http.build();
}
} 8. Implement Authorization using Thymeleaf Integration with Spring Security
To use Thymeleaf with Spring Security for the view, make sure you declare the relevant XML namespaces like this:<html xmlns:th="http://www.thymeleaf.org" xmlns:sec="https://www.thymeleaf.org/thymeleaf-extras-springsecurity6">To display username of a logged-in user, use the following code:
<span sec:authentication="name">Username</span>To show all the roles (authorities/permissions/rights) of the current user, use the following code:
<span sec:authentication="principal.authorities">Roles</span>To show a section that is for only authenticated users, use the following code:
<div sec:authorize="isAuthenticated()"> Welcome <b><span sec:authentication="name">Username</span></b> <i><span sec:authentication="principal.authorities">Roles</span></i> </div>To display the Logout button:
<form th:action="@{/logout}" method="post">
	<input type="submit" value="Logout" />
</form>
Because only the users have role CREATOR or ADMIN can create new products, so write the following code to show the Create New Product link which is visible to only authorized users:<div sec:authorize="hasAnyAuthority('CREATOR', 'ADMIN')">
<a href="/new">Create New Product</a>
</div>The users with role EDITOR or ADMIN can see the links to edit/update products, thus the following code:<div sec:authorize="hasAnyAuthority('ADMIN', 'EDITOR')">
<a th:href="/@{'/edit/' + ${product.id}}">Edit</a>
</div>And only ADMIN users can see the link to delete products:<div sec:authorize="hasAuthority('ADMIN')">
<a th:href="/@{'/delete/' + ${product.id}}">Delete</a>
</div>That’s basically how to authorize users in the view layer using Thymeleaf with Spring Security. For more advanced authorization, you can learn in Spring Boot E-Commerce Ultimate Course.I recommend you to watch the following video to see the coding in action and how I test the login, logout and authorization: Conclusion:So far you have learned how to authorize users based on their roles using Spring Security and Thymeleaf for a Spring Boot Application. You see, Spring framework makes it easy and convenient to implement authorization with minimal effort. For reference, you can download the sample project attached below.You can also the the sample project on GitHub here. Other Spring Security Tutorials:
- Spring Boot Security Form Authentication with JDBC and MySQL
- Spring Boot Security Form Authentication with in-memory users
- Spring Boot Security HTTP Basic Authentication with in-memory users
- Spring Boot Security Authentication with JPA, Hibernate and MySQL
Other Spring Boot Tutorials:
- Spring Boot automatic restart using Spring Boot DevTools
- Spring Boot Form Handling Tutorial with Spring Form Tags and JSP
- How to create a Spring Boot Web Application (Spring MVC with JSP/ThymeLeaf)
- Spring Boot - Spring Data JPA - MySQL Example
- Spring Boot Hello World RESTful Web Services Tutorial
- How to use JDBC with Spring Boot
- Spring Boot CRUD Web Application with JDBC - Thymeleaf - Oracle
- Spring Boot RESTful CRUD API Examples with MySQL database
- How to package Spring Boot application to JAR and WAR
About the Author:
 Nam Ha Minh is certified Java programmer (SCJP and SCWCD). He began programming with Java back in the days of Java 1.4 and has been passionate about it ever since. You can connect with him on Facebook and watch his Java videos on YouTube.
| [Sample Spring Boot Security project] | 87 kB |
Comments
When i implement your tut to my project i can not run application because of this error:
java: cannot access javax.servlet.Filter
class file for javax.servlet.Filter not found
As i find this error is by : WebSecurityConfigurerAdapter
java: cannot access javax.servlet.Filter
class file for javax.servlet.Filter not found
I use InteliJ with Java 20 Maven 4.0.0
And the problem is with WebSecurityConfigurerAdapter can you help me?