Spring Boot Form Validation Tutorial
- Details
- Written by Nam Ha Minh
- Last Updated on 21 April 2020 | Print Email
 Note that the form validation takes place on the server side – not on the client side (Javascript or jQuery). I think server-side form validation is better and more secure than client-side form validation because it’s easy to bypass client-side validation.This tutorial will start with the code presented in the Spring Boot Thymeleaf Form Handling Tutorial.That means I suppose that we already have a Spring Boot project with a form, and now just add code for the form validation.
 1. Understand Java Bean Validation Constraints
With Spring framework, we don’t have to write any single line of code to validate form fields from scratch, e.g. checking if a text field is empty or not. Instead, we will use some built-in constraints from Bean Validation API of Java EE and form validation API provided by Spring MVC. In other words, we will use some annotations to specify constraints (validation rules) for the fields in a model class. Consider an example:import javax.validation.constraints.Email;
import javax.validation.constraints.NotBlank;
public class User {
@Size(min = 3, max = 50)
private String name;
@Email
private String email;
}Here, the model class User has 2 fields: name and email. The field name is annotated with the @Size annotation to specify length constraint for its value, which means name must have at least 3 characters and must not have more than 50 characters; And the field email is annotated with the @Email annotation to make sure that the user will enter email in the correct format.Below are some constraints defined by Java Bean Validation API:- @NotEmpty: specifies that the annotated field must not be null or empty.
- @NotBlank: the annotated field must not be null and must contain at least one non-whitespace character.
- @NotNull: the annotated field must not be null.
- @Email: the string has to be a well-formed email address.
- @Min: the field must be a number whose value must be higher or equal to the specified minimum value.
- @Max: the field must be a number whose value must be lower or equal to the specified maximum value.
- @Size: the field must have size falls within the specified range. Applied for string, collections and arrays.
2. Specify Constraints for Fields in the Model Class
In the Spring Boot Thymeleaf Form project, we have the model class User with the following fields:public class User {
private String name;
private String email;
private String password;
private String gender;
private String note;
private boolean married;
private Date birthday;
private String profession;
private long income;
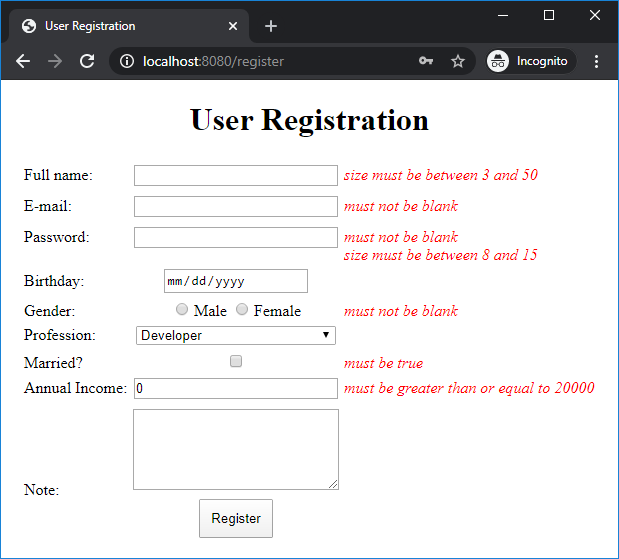
}Now we need to apply the following validation rules (constraints):- name: must have 3 to 50 characters.
- email: must not be blank and well-formed.
- password: must not be blank and must contain 8 to 15 characters.
- gender: must not be blank.
- note: has less than 100 characters (0-100).
- married: must be true (to demonstrate the @AssertTrue constraint).
- birthday: must be in the date format yyyy-mm-dd.
- profession: must be not blank.
- income: must be within the range from 20K to 200K.
So we update the User model class as follows:import java.util.Date;
import javax.validation.constraints.*;
import org.springframework.format.annotation.DateTimeFormat;
public class User {
@Size(min = 3, max = 50)
private String name;
@NotBlank
@Email(message = "Please enter a valid e-mail address")
private String email;
@NotBlank
@Size(min = 8, max = 15)
private String password;
@NotBlank
private String gender;
@Size(max = 100)
private String note;
@AssertTrue
private boolean married;
@DateTimeFormat(pattern = "yyyy-mm-dd")
private Date birthday;
@NotBlank
private String profession;
@Min(value = 20_000)
@Max(value = 200_000)
private long income;
}Note that the @DateTimeFormat annotation comes from Spring framework’s API.By default, the validation error messages are defined by the Bean validation API. To override the default error message for a field, specify the message attribute for a constraint. For example:@Email(message = "Please enter a valid e-mail address") private String email;
3. Update the Form Page to show validation error messages
Next, we need to update the form page (JSP with Spring form tags or Thymeleaf) to render validation error message for each field. If you use Spring form tags with JSP, add the <form:errors> tag after each field:<form:errors path="name" cssClass="error" />The cssClass attributes refers to a CSS class to style the error message. So we define a CSS class like this:
.error {
	color: red;
	font-style: italic;
}
Hence the code for the name field in the form:<form:label path="name">Full name:</form:label> <form:input path="name" /> <form:errors path="name" cssClass="error" />In case you use Thymeleaf template, add a <span> tag after each field as below:
<span th:if="${#fields.hasErrors('name')}" th:errors="*{name}">Full name error</span>Hence the code for the name field in the form:<label>Full name:</label>
<input type="text" th:field="*{name}" />
<span th:if="${#fields.hasErrors('name')}" th:errors="*{name}">Full name error</span>Add similar code to the rest fields in the form. Spring will render the <span> tag to display the error message next to the field in case the input violates the specified constraint. So you can also style the error message based on HTML’s span tag as follows:span {
color: red;
font-style: italic;
}Note that for the date field, you can use <input type=”date”> to let the browser displays a built-in date picker – and you won’t have to worry that the user may input date in the wrong format. For example:
<form:input path="birthday" type="date"/>
<input type="date" th:field="*{birthday}" />
Now all major browsers provide a built-in date picker. 4. Update the Controller Class
In the handler method for form submission in Spring MVC controller class, we need to use the @Valid annotation before the @ModelAttribute one, and check the validation errors via a BindingResult object. So update the handler method as below:import javax.validation.Valid;
import org.springframework.validation.BindingResult;
...
@PostMapping("/register")
public String submitForm(@Valid @ModelAttribute("user") User user,
BindingResult bindingResult) {
System.out.println(user);
if (bindingResult.hasErrors()) {
return "register_form";
} else {
return "register_success";
}
}If the form has errors, we revert to the form page, otherwise showing the result page.That’s the tutorial for form validation in a Spring Boot application. For the complete sample code, you can download under the Attachments section below.You can also watch the video version of this tutorial below: References:
Built-in Constraints of Java Bean Validation API
Related Tutorials:
- Spring Boot Form Handling Tutorial with Spring Form Tags and JSP
- Spring Boot Thymeleaf Form Handling Tutorial
- Spring MVC Form Handling Tutorial and Example
- Spring MVC Form Validation Example with Bean Validation API
Other Spring Boot Tutorials:
- Spring Boot Hello World Example
- Spring Boot automatic restart using Spring Boot DevTools
- Spring Boot Hello World RESTful Web Services Tutorial
- How to create a Spring Boot Web Application (Spring MVC with JSP/ThymeLeaf)
- Spring Boot - Spring Data JPA - MySQL Example
- Spring Boot CRUD Example with Spring MVC – Spring Data JPA – ThymeLeaf - Hibernate - MySQL
- How to use JDBC with Spring Boot
- Spring Boot CRUD Web Application with JDBC - Thymeleaf - Oracle
- Spring Boot RESTful CRUD API Examples with MySQL database
- How to package Spring Boot application to JAR and WAR
About the Author:
 Nam Ha Minh is certified Java programmer (SCJP and SCWCD). He started programming with Java in the time of Java 1.4 and has been falling in love with Java since then. Make friend with him on Facebook and watch his Java videos you YouTube.
| [Spring Boot Form Validation JSP] | 72 kB | |
| [Spring Boot Thymeleaf Form Validation] | 74 kB |