Spring Boot Security Form Authentication with JDBC and MySQL
- Details
- Written by Nam Ha Minh
- Last Updated on 11 April 2024 | Print Email
1. Create users table and dummy credentials
The credentials should be stored in database, so let’s create a new table named users with the following columns: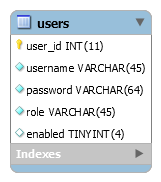
CREATE TABLE `users` (
  `user_id` int(11) NOT NULL AUTO_INCREMENT,
  `username` varchar(45) NOT NULL,
  `password` varchar(64) NOT NULL,
  `role` varchar(45) NOT NULL,
  `enabled` tinyint(4) DEFAULT NULL,
  PRIMARY KEY (`user_id`)
);
And execute the following SQL INSERT statements to create two users:
INSERT INTO `users` (`username`,`password`,`role`,`enabled`)
VALUES ('namhm',
'$2a$10$XptfskLsT1l/bRTLRiiCgejHqOpgXFreUnNUa35gJdCr2v2QbVFzu',
'ROLE_USER', 1);

INSERT INTO `users` (`username`,`password`,`role`,`enabled`)
VALUES ('admin',
'$2a$10$zxvEq8XzYEYtNjbkRsJEbukHeRx3XS6MDXHMu8cNuNsRfZJWwswDy',
'ROLE_ADMIN', 1);
The first user namhm has role USER and password is codejava. And the second user admin has role ADMIN with password is nimda. Both users are enabled.You can see the passwords are encoded in BCrypt format. You can write a simple program to generate your passwords as describe in this tutorial.2. Configure Data Source Properties
Next, specify database connection information in the application.properties file like this:spring.datasource.url=jdbc:mysql://localhost:3306/testdb spring.datasource.username=root spring.datasource.password=passwordUpdate the URL, username and password according to your MySQL database.
3. Declare Dependencies for Spring Security and MySQL JDBC Driver
To use Spring Security APIs for the project, declare the following dependency in the pom.xml file:<dependency> <groupId>org.springframework.boot</groupId> <artifactId>spring-boot-starter-security</artifactId> </dependency>And to use JDBC with Spring Boot and MySQL:
<dependency>
    <groupId>org.springframework.boot</groupId>
    <artifactId>spring-boot-starter-jdbc</artifactId>
</dependency>
<dependency>
    <groupId>mysql</groupId>
    <artifactId>mysql-connector-java</artifactId>
    <scope>runtime</scope>
</dependency>
Note that the dependency versions are already defined by the Spring Boot starter parent project.With Spring Boot 3.x, you need to declare the MySQL JDBC dependency as follows:<dependency> <groupId>com.mysql</groupId> <artifactId>mysql-connector-j</artifactId> <scope>runtime</scope> </dependency>
4. Configure JDBC Authentication Details
To use Spring Security with form-based authentication and JDBC, create the WebSecurityConfig class as follows:package net.codejava;
import javax.sql.DataSource;
import org.springframework.beans.factory.annotation.Autowired;
import org.springframework.context.annotation.Configuration;
import org.springframework.security.config.annotation.authentication.builders.*;
import org.springframework.security.config.annotation.web.builders.HttpSecurity;
import org.springframework.security.config.annotation.web.configuration.*;
import org.springframework.security.crypto.bcrypt.BCryptPasswordEncoder;
@Configuration
@EnableWebSecurity
public class WebSecurityConfig extends WebSecurityConfigurerAdapter {
@Autowired
private DataSource dataSource;
@Autowired
public void configAuthentication(AuthenticationManagerBuilder auth) throws Exception {
	auth.jdbcAuthentication().passwordEncoder(new BCryptPasswordEncoder())
		.dataSource(dataSource)
		.usersByUsernameQuery("select username, password, enabled from users where username=?")
		.authoritiesByUsernameQuery("select username, role from users where username=?")
	;
}
@Override
protected void configure(HttpSecurity http) throws Exception {
	http.authorizeRequests()
		.anyRequest().authenticated()
		.and()
		.formLogin().permitAll()
		.and()
		.logout().permitAll();
}
}This security configuration class must be annotated with the @EnableWebSecurity annotation and is a subclass of WebSecurityConfigurerAdapter.An instance of DataSource object will be created and injected by Spring framework:@Autowired private DataSource dataSource;It will read database connection information from the application.properties file.And to configure authentication using JDBC, write the following method:
@Autowired
public void configAuthentication(AuthenticationManagerBuilder auth) throws Exception {
auth.jdbcAuthentication().passwordEncoder(new BCryptPasswordEncoder())
.dataSource(dataSource)
.usersByUsernameQuery("select username, password, enabled from users where username=?")
.authoritiesByUsernameQuery("select username, role from users where username=?")
;
}As you can see, we need to specify a password encoder (BCrypt is recommended), data source and two SQL statements: the first one selects a user based on username, and the second one selects role of the user. Note that Spring security requires the column names must be username, password, enabled and role.And to configure form-based authentication, we override the configure(HttpSecurity) method as follows:@Override
protected void configure(HttpSecurity http) throws Exception {
http.authorizeRequests()
.anyRequest().authenticated()
.and()
.formLogin().permitAll()
.and()
.logout().permitAll();
}Here, we specify that all requests must be authenticated, meaning the users must login to use the application. The default login form provided by Spring security is used. NOTE: For Spring Boot 3.x with Spring Security 6.x, update the security configuration class as shown below:package net.codejava;
import javax.sql.DataSource;
import org.springframework.beans.factory.annotation.Autowired;
import org.springframework.context.annotation.Bean;
import org.springframework.context.annotation.Configuration;
import org.springframework.security.config.annotation.authentication.builders.AuthenticationManagerBuilder;
import org.springframework.security.config.annotation.web.builders.HttpSecurity;
import org.springframework.security.crypto.bcrypt.BCryptPasswordEncoder;
import org.springframework.security.web.SecurityFilterChain;
@Configuration
public class WebSecurityConfig {
@Autowired
private DataSource dataSource;
@Autowired
public void configAuthentication(AuthenticationManagerBuilder authBuilder) throws Exception {
authBuilder.jdbcAuthentication()
.dataSource(dataSource)
.passwordEncoder(new BCryptPasswordEncoder())
.usersByUsernameQuery("select username, password, enabled from users where username=?")
.authoritiesByUsernameQuery("select username, role from users where username=?")
;
}
@Bean
SecurityFilterChain securityFilterChain(HttpSecurity http) throws Exception {
http.authorizeHttpRequests(auth -> auth
.anyRequest().authenticated())
.formLogin(login -> login.permitAll())
.logout(logout -> logout.permitAll())
;
return http.build();
}
}To show username of the logged in user, write the following code in a Thymeleaf template file:<h3 th:inline="text">Welcome [[${#httpServletRequest.remoteUser}]]</h3> NOTE: with Thymeleaf 3.1.2 or newer, display username of the authenticated user as follows:<h3 th:inline="text">Welcome <span sec:authentication="principal.username"></span></h3>And to add a Logout button:
<form th:action="@{/logout}" method="post">
	<input type="submit" value="Logout" />
</form>
As you can see, Spring Security will handle login and logout for the application. We don’t have to write repetitive code, just specify some configurations. 5. Test Login and Logout
Start the Spring Boot application and access http://localhost:8080 in web browser, you will see the default login page provided by Spring security appears: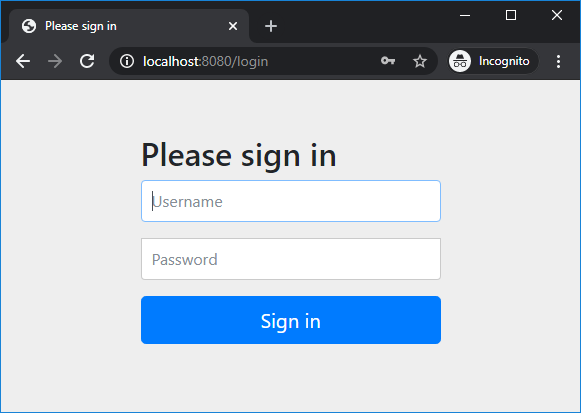 Try to login with username namhm and password code123, you should see this error:
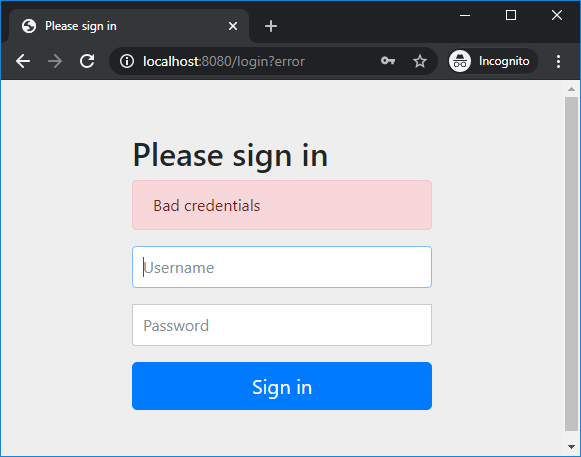 Now enter correct username namhm and password codejava, you will see the homepage as follows:
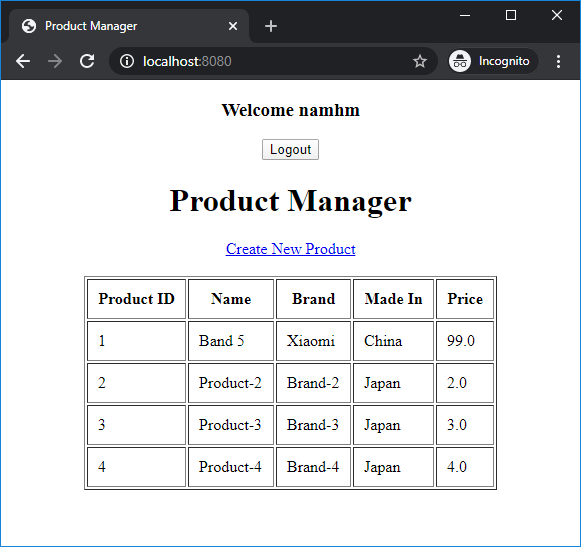 And notice the welcome message followed by the username. The user is now authenticated to use the application.Click Logout button and you will see:
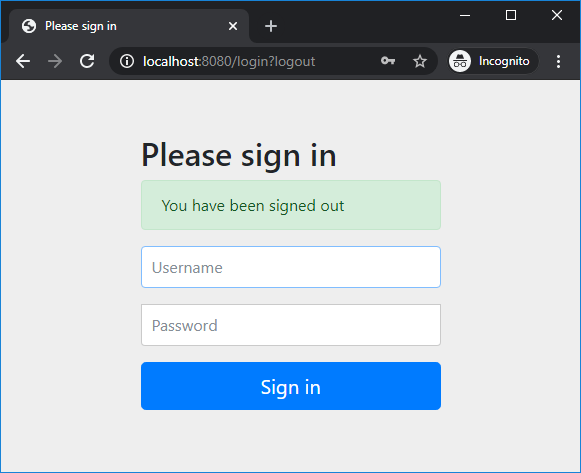 That means we have successfully implemented login and logout to our Spring Boot application. For basic role-based authorization, watch the video below:
Conclusion:
So far you have learned to secure a Spring Boot application with form-based authentication and in-database credentials. You see Spring Security makes it easy to implement login and logout functions, and very conveniently. For your convenience, you can clone the code on GitHub, or download the sample project under the Attachments section below.Related Spring Security Tutorials:
- Spring Boot Security Customize Login and Logout
- Spring Boot Security Form Authentication with in-memory users
- Spring Boot Security HTTP Basic Authentication with in-memory users
- Spring Boot Security Authentication with JPA, Hibernate and MySQL
- Spring Boot Security Role-based Authorization Tutorial
Other Spring Boot Tutorials:
- Spring Boot automatic restart using Spring Boot DevTools
- Spring Boot Form Handling Tutorial with Spring Form Tags and JSP
- How to create a Spring Boot Web Application (Spring MVC with JSP/ThymeLeaf)
- Spring Boot - Spring Data JPA - MySQL Example
- Spring Boot Hello World RESTful Web Services Tutorial
- How to use JDBC with Spring Boot
- Spring Boot CRUD Web Application with JDBC - Thymeleaf - Oracle
- Spring Boot RESTful CRUD API Examples with MySQL database
- How to package Spring Boot application to JAR and WAR
About the Author:
 Nam Ha Minh is certified Java programmer (SCJP and SCWCD). He began programming with Java back in the days of Java 1.4 and has been passionate about it ever since. You can connect with him on Facebook and watch his Java videos on YouTube.
| [Sample Spring Boot Security project] | 76 kB |