- Details
- Written by Nam Ha Minh
- Last Updated on 20 September 2020 | Print Email
In this post, I will share some code examples demonstrating uploading multiple files in a Java web application based on Spring Boot. For getting-started tutorial, you may need to check this
Spring Boot File Upload Tutorial first. Note that the uploaded files will be stored in the file system on the server side.Suppose that we want to show a form in which the user is required to pick 3 files to be uploaded. So we add 3 file input to the form like this:
<form th:action="@{/submit}" method="post"
    th:object="${candidate}"
    enctype="multipart/form-data"
    >
    ...
    <div>
	<label>Profile Picture: </label>
    	<input type="file" name="profilePictureFile" th:field=”*{firstName} accept="image/png, image/jpeg" required />
    </div>
    <div>
	<label>Photo ID: </label>
    	<input type="file" name="photoIdFile" th:field=”*{lastName} accept="image/png, image/jpeg" required />
    </div>
    <div>
	<label>Document: </label>
    	<input type="file" name="documentFile" required />
    </div>
    ...
</form>
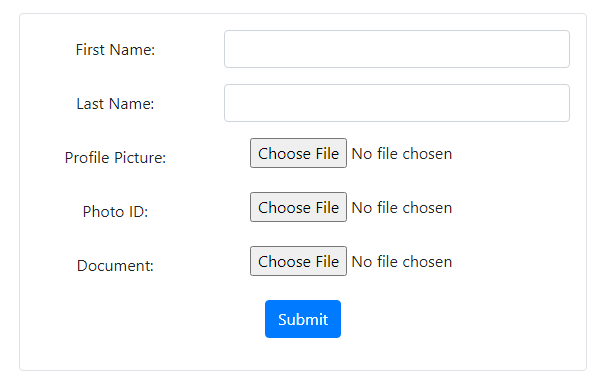
Here we have 3 file input fields with different names: profilePictureFile, photoIDFile and documentFile. The profilePictureFile and photoIDFile can be only images, whereas the documentFile can be of any type. And all these 3 file inputs are required.The form would look something like below in a web browser:

And in the data access layer, we have an entity class that looks like follows:
package net.codejava;

import javax.persistence.*;

@Entity
@Table(name = "candidates")
public class Candidate {
	@Id
	@GeneratedValue(strategy = GenerationType.IDENTITY)
	private Integer id;

	@Column(name = "first_name")
	private String firstName;

	@Column(name = "last_name")
	private String lastName;

	@Column(name = "profile_picture")
	private String profilePicture;

	@Column(name = "photo_id")
	private String photoId;

	@Column(name = "document")
	private String document;

	// getters & setters are not shown

}
As you can see, this entity class has 3 fields to store names of the uploaded files: profilePicture, photoId and document. The actual files will be stored in the file system.And below is code for the handler method in Spring MVC controller class:
package net.codejava;

import java.io.IOException;

import org.springframework.beans.factory.annotation.Autowired;
import org.springframework.stereotype.Controller;
import org.springframework.ui.Model;
import org.springframework.util.StringUtils;
import org.springframework.web.bind.annotation.PostMapping;
import org.springframework.web.bind.annotation.RequestParam;

@Controller
public class AppController {

	@Autowired
	private CandidateRepository candidateRepo;

	@PostMapping("/upload_multiple")
	public String handleFormSubmit(Candidate candidate,
			@RequestParam("profilePictureFile") MultipartFile multipartFile1,
			@RequestParam("photoIdFile") MultipartFile multipartFile2,
			@RequestParam("documentFile") MultipartFile multipartFile3) throws IOException {

		String profilePictureFileName = StringUtils.cleanPath(multipartFile1.getOriginalFilename());
		String photoIdFileName = StringUtils.cleanPath(multipartFile2.getOriginalFilename());
		String documentFileName = StringUtils.cleanPath(multipartFile3.getOriginalFilename());

		candidate.setProfilePicture(profilePictureFileName);
		candidate.setPhotoId(photoIdFileName);
		candidate.setDocument(documentFileName);

		Candidate savedCandidate = candidateRepo.save(candidate);
		String uploadDir = "candidates/" + savedCandidate.getId();

		FileUploadUtil.saveFile(uploadDir, profilePictureFileName, multipartFile1);
		FileUploadUtil.saveFile(uploadDir, photoIdFileName, multipartFile2);
		FileUploadUtil.saveFile(uploadDir, documentFileName, multipartFile3);

		return "message";
	}

}
As you can see, we read names of the uploaded files first – and store names in the corresponding fields of the entity class that maps to the file upload form. Then we persist the entity object to the database. And then we store the uploaded files in the file system.
Below is code of the
FileUploadUtil class:
package net.codejava;

import java.io.*;
import java.nio.file.*;

import org.springframework.web.multipart.MultipartFile;

public class FileUploadUtil {
    public static void saveFile(String uploadDir, String fileName,
            MultipartFile multipartFile) throws IOException {
        Path uploadPath = Paths.get(uploadDir);

        if (!Files.exists(uploadPath)) {
            Files.createDirectories(uploadPath);
        }

        try (InputStream inputStream = multipartFile.getInputStream()) {
            Path filePath = uploadPath.resolve(fileName);
            Files.copy(inputStream, filePath, StandardCopyOption.REPLACE_EXISTING);
        } catch (IOException ioe) {
            throw new IOException("Could not save image file: " + fileName, ioe);
        }
    }
}
You can use the same name for all file input elements like this:
<input type="file" name="files" accept="image/png, image/jpeg"  />
...
<input type="file" name="files" accept="image/png, image/jpeg"  />
...
<input type="file" name="files"  />
Then you need to use an array of
MultipartFile objects in the handler method as follows:
@PostMapping("/upload_multiple")
public String handleFormSubmit(Candidate candidate,
		@RequestParam("files") MultipartFile[] multipartFiles) {
	...
}
Of course then you need to access the upload file in terms of array elements.That’s some code examples showing you how to implement multiple files upload functionality in a Spring Boot application.
Related Tutorials:
Spring Boot File Upload Tutorial (Upload and Display Images) Other Spring Boot Tutorials:
About the Author:
 Nam Ha Minh
 is certified Java programmer (SCJP and SCWCD). He began programming with Java back in the days of Java 1.4 and has been passionate about it ever since. You can connect with him on
Facebook and watch
his Java videos on YouTube.
 And in the data access layer, we have an entity class that looks like follows:
 Nam Ha Minh is certified Java programmer (SCJP and SCWCD). He began programming with Java back in the days of Java 1.4 and has been passionate about it ever since. You can connect with him on Facebook and watch his Java videos on YouTube.