Through this Spring Security tutorial, I will guide you how to tighten security of a Spring Boot application by implementing limit login attempts function that prevents brute-force passwords guessing which can be exploited by hackers.You will learn how to implement the limit login attempts function with the following strategy:
A user can login failed 3 times maximum. His account will be locked on the last failed attempt.
The user account is locked during 24 hours. That means after this duration the user account will be unlocked (upon the next login attempt).
Suppose that you’re developing a Java web application based on Spring Boot with authentication already implemented using Spring Security and MySQL database (stores user information). And as common standard, Thymeleaf is used as the template engine, Spring Data JPA and Hibernate in the data access layer, and HTML 5 and Bootstrap for the UI.
1. Update Users table and User Entity Class
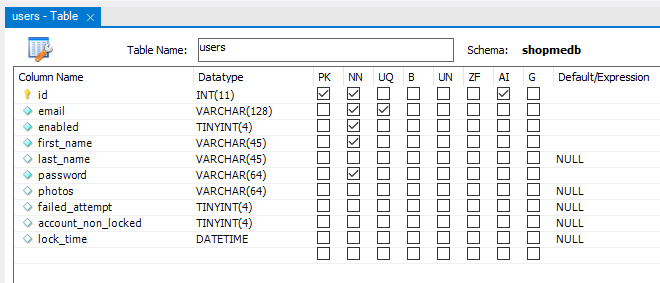
Suppose that the user information is stored in a table named users. You need to add 3 extra columns in order to implement the limit login attempt function. They are:
failed_attempt: a small integer number that indicates the number of failed login attempts. The user’s account will be locked if failed_attempt > 2. The default value is 0.
account_non_locked: a boolean value that indicates the user’s account is locked or not. Spring Security will reject login of a locked account. The default value is true (1 in MySQL).
lock_time: a date time value that indicates the time at which the user’s account is locked. Based on this value the application can determine when the lock expires and unlock the user’s account. The default value is null.
The following picture shows structure of the users table with 3 new columns:Then update the entity class User as follows:
Here, we add 3 new fields that map to the 3 new columns in the users table accordingly.
2. Update UserDetails Class
When implementing authentication using Spring Security, you already created a class of type UserDetailsto hold details of an authenticated user. So make sure that the isAccountNonLocked() method is updated as follows:
import org.springframework.security.core.userdetails.UserDetails;


public class ShopmeUserDetails implements UserDetails {
	private User user;

	public ShopmeUserDetails(User user) {
		this.user = user;
	}

	@Override
	public boolean isAccountNonLocked() {
		return user.isAccountNonLocked();
	}

	// other overridden methods...
}
It’s important because Spring Security will reject authentication if this method returns false.
3. Update User Repository and Service Classes
Next, you need to declare a method in the UserRepositoryclass to update the number of failed login attempts for a user based on his email, as follows:
import org.springframework.data.jpa.repository.*;

public interface UserRepository extends JpaRepository<User, Integer> {

	@Query("UPDATE User u SET u.failedAttempt = ?1 WHERE u.email = ?2")
	@Modifying
	public void updateFailedAttempts(int failAttempts, String email);

}
As you can see, we use a custom query (JPA query).And update the business class UserServices by implementing 4 new methods and a couple of constants, as follows:
@Service
@Transactional
public class UserServices {

	public static final int MAX_FAILED_ATTEMPTS = 3;

	private static final long LOCK_TIME_DURATION = 24 * 60 * 60 * 1000;	// 24 hours

	@Autowired
	private UserRepository repo;

	public void increaseFailedAttempts(User user) {
		int newFailAttempts = user.getFailedAttempt() + 1;
		repo.updateFailedAttempts(newFailAttempts, user.getEmail());
	}

	public void resetFailedAttempts(String email) {
		repo.updateFailedAttempts(0, email);
	}

	public void lock(User user) {
		user.setAccountNonLocked(false);
		user.setLockTime(new Date());

		repo.save(user);
	}

	public boolean unlockWhenTimeExpired(User user) {
		long lockTimeInMillis = user.getLockTime().getTime();
		long currentTimeInMillis = System.currentTimeMillis();

		if (lockTimeInMillis + LOCK_TIME_DURATION < currentTimeInMillis) {
			user.setAccountNonLocked(true);
			user.setLockTime(null);
			user.setFailedAttempt(0);

			repo.save(user);

			return true;
		}

		return false;
	}
}
Let me explain this new code. First, we declare the maximum number of failed login attempts allowed:
public static final int MAX_FAILED_ATTEMPTS = 3;
And duration of the lock time in milliseconds:
private static final long LOCK_TIME_DURATION = 24 * 60 * 60 * 1000; // 24 hours
So it would be easy to configure/change the maximum allowed failed logins and lock duration. And let’s come to the new methods:
increaseFailedAttempts(): this method updates the number of failed attempts of a user. It is called each time the user fails to login (e.g. providing wrong username or password).
resetFailedAttempts(): sets the number of failed attempts to zero. This method will be called when the user has logged in successfully.
lock(): locks the user’s account if the number of failed logins reach the maximum allowed times.
unlockWhenTimeExpired(): unlocks the user’s account when lock duration expires, allowing the user to login as usual.
4. Update Login Page
In your custom login page, ensure that it contains the following code snippet to display the exception message upon failed login.
It’s important to have this code in the login page, so it will show the original error message generated by Spring Security.To learn more about coding a custom login page with Spring Security, refer to this article.
5. Code Authentication Failure Handler
Next, we need to code a custom authentication failure handler class to intervene the authentication process of Spring Security in order to update the number of failed login attempts, lock and unlock the user’s account. So create a new class CustomLoginFailureHandler with the following code:
package com.shopme.admin.security;

import java.io.IOException;

import javax.servlet.ServletException;
import javax.servlet.http.HttpServletRequest;
import javax.servlet.http.HttpServletResponse;

import org.springframework.beans.factory.annotation.Autowired;
import org.springframework.security.authentication.LockedException;
import org.springframework.security.core.AuthenticationException;
import org.springframework.security.web.authentication.SimpleUrlAuthenticationFailureHandler;
import org.springframework.stereotype.Component;

@Component
public class CustomLoginFailureHandler extends SimpleUrlAuthenticationFailureHandler {

	@Autowired
	private UserServices userService;

	@Override
	public void onAuthenticationFailure(HttpServletRequest request, HttpServletResponse response,
			AuthenticationException exception) throws IOException, ServletException {
		String email = request.getParameter("email");
		User user = userService.getByEmail(email);

		if (user != null) {
			if (user.isEnabled() && user.isAccountNonLocked()) {
				if (user.getFailedAttempt() < UserServices.MAX_FAILED_ATTEMPTS - 1) {
					userService.increaseFailedAttempts(user);
				} else {
					userService.lock(user);
					exception = new LockedException("Your account has been locked due to 3 failed attempts."
							+ " It will be unlocked after 24 hours.");
				}
			} else if (!user.isAccountNonLocked()) {
				if (userService.unlockWhenTimeExpired(user)) {
					exception = new LockedException("Your account has been unlocked. Please try to login again.");
				}
			}

		}

		super.setDefaultFailureUrl("/login?error");
		super.onAuthenticationFailure(request, response, exception);
	}

}
Let me explain this code. First, it gets a User object based on the email which was entered in the login page. If the user is found in the database and the user is enabled and non-locked:
Increase the number of failed login attempts if it has not reached the maximum allowed times, else:
Lock the user’s account if the failed login times is equal or greater than the maximum allowed times.
And in case the user’s account is locked, it will try to unlock the account if lock duration expires.Note that we throw LockedException (defined by Spring Security) with custom error message that will be displayed in the login page.Read this article to learn more about authentication failure handler in Spring Security.
6. Code Authentication Success Handler
There can be a case in which the user fails to login the first time (or second time) but successful on the next time. So the application should clear the number of failed login attempts immediately after the user has logged in successfully.To do so, you need to create a custom authentication handler class with the following code:
That’s done for the coding. Next, we’re ready to test the limit login attempt function.
8. Test Limit Login Attempts Function
Before testing, ensure that the new columns have default values: 0 for failed_attempt, true for account_non_locked and null for lock_time.Start your Spring Boot application and go to the login page. Enter a correct username but wrong password, you would see the following error at the first failed login attempt:Check the database and you should see failed_attempt = 1. Now try to login with a wrong password again. You would see the same error, but failed_attempt = 2.Next, try to make the third failed login, it says the user’s account has been locked:Check the database, and you should see failed_attempt = 2, account_non_locked = 0 (false) and lock_time is set to a specific time.Then the user won’t be able to login during 24 hours since his account is locked.Wait for the lock time expires (for quick testing, you can change the lock time duration to 5 minutes), and login again with correct credentials. The user will see this screen:And the user must login again (with correct credentials). Check the database and you should see values of the new 3 columns have been set to default values.That’s some code examples and references for you to implement the limit login attempt function in a Spring Boot application. To see the coding in action, I recommend you to watch the following video:
Nam Ha Minh is certified Java programmer (SCJP and SCWCD). He began programming with Java back in the days of Java 1.4 and has been passionate about it ever since. You can connect with him on Facebook and watch his Java videos on YouTube.
Hi Team, I need a "Spring boot project with limited login attempts" source code(even in this website codejava.net not able to find) please help me and put the with downloadable source code in the website
 Then update the entity class User as follows:
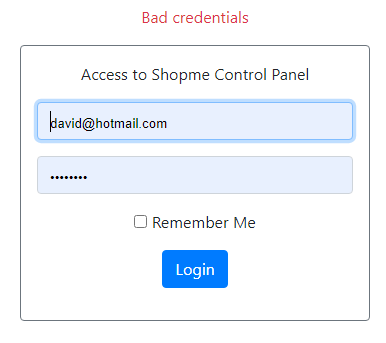 Check the database and you should see failed_attempt = 1. Now try to login with a wrong password again. You would see the same error, but failed_attempt = 2.Next, try to make the third failed login, it says the user’s account has been locked:
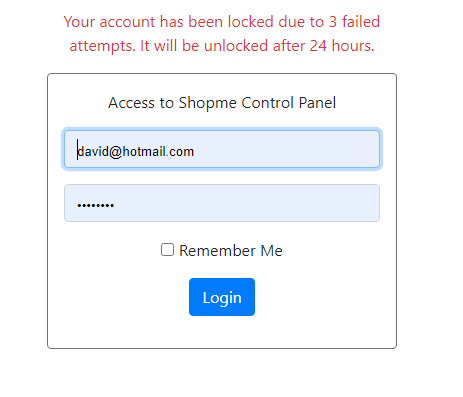 Check the database, and you should see failed_attempt = 2, account_non_locked = 0 (false) and lock_time is set to a specific time.Then the user won’t be able to login during 24 hours since his account is locked.Wait for the lock time expires (for quick testing, you can change the lock time duration to 5 minutes), and login again with correct credentials. The user will see this screen:
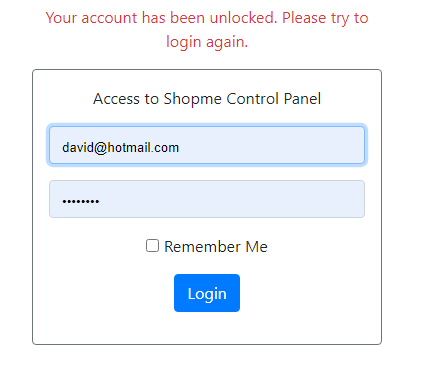 And the user must login again (with correct credentials). Check the database and you should see values of the new 3 columns have been set to default values.That’s some code examples and references for you to implement the limit login attempt function in a Spring Boot application. To see the coding in action, I recommend you to watch the following video:
  Nam Ha Minh is certified Java programmer (SCJP and SCWCD). He began programming with Java back in the days of Java 1.4 and has been passionate about it ever since. You can connect with him on Facebook and watch his Java videos on YouTube.
Comments
I need a "Spring boot project with limited login attempts" source code(even in this website codejava.net not able to find) please help me and put the with downloadable source code in the website
Thank you
all the related code in the article. If you want to learn the full project development, I recommend you learn my course on Udemy here: www.udemy.com/.../spring-boot-e-commerce-ultimate