In this Spring Security tutorial, I would like to share with you guys a reference solution which you can follow to implement the One-Time Password (OTP) email function for an existing Spring Boot application based on standard technologies like Spring Data JPA, Spring Security, Spring Mail, Thymeleaf and MySQL database.Here’s the strategy which I employ in this tutorial:
When a user attempts to login, the application will send a one-time password to the user’s email if it detects that the login request is suspicious. A good way to detect suspicious request is using Google RECAPTHA API.
The OTP is a random String with 8-character length (and it is supposed to be unique among all users).
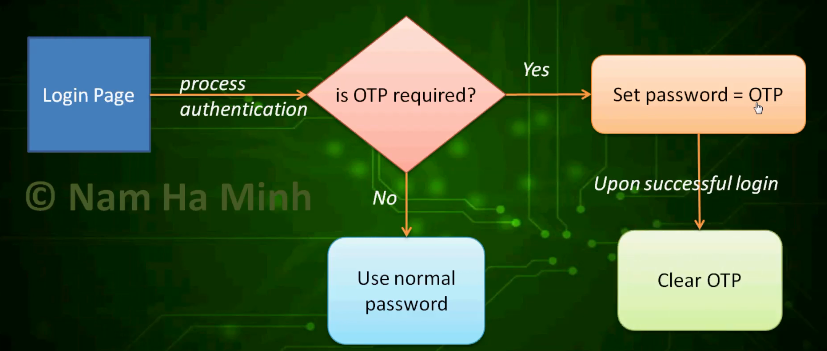
The OTP will expire in 5 minutes. Within this time, the user must provide the OTP which can be found in his email. When the OTP expires, the user can use normal password to login, and the process starts over.
With this strategy, no new technologies required so it will be easy to implement. The following picture helps you understand the workflow of the OTP email functionality:
1. Update Database Table and Entity Class
Suppose that you store user information in a table named customers, so let alter the table by adding two new columns as follows:The two new columns are one_time_password that stores the hash of the generated random password (using BCrypt password encoder) and otp_requested_time that stores the time when the OTP is generated – it will be used to check the OTP expiration.Then update the corresponding entity class as follows:
@Entity
@Table(name = "customers")
public class Customer {

	private static final long OTP_VALID_DURATION = 5 * 60 * 1000;	// 5 minutes

	@Column(name = "one_time_password")
	private String oneTimePassword;

	@Column(name = "otp_requested_time")
	private Date otpRequestedTime;


	public boolean isOTPRequired() {
		if (this.getOneTimePassword() == null) {
			return false;
		}

		long currentTimeInMillis = System.currentTimeMillis();
		long otpRequestedTimeInMillis = this.otpRequestedTime.getTime();

		if (otpRequestedTimeInMillis + OTP_VALID_DURATION < currentTimeInMillis) {
			// OTP expires
			return false;
		}

		return true;
	}


	// other fields, getters and setters are not shown
}
Here, we declare a constant for the OTP expiration time in milliseconds, two fields that map to the newly added two columns (oneTimePassword and otpRequestedTime) and the isOTPRequired() method is used to check whether the OTP expires or not.
2. Configure Email Dependency and Mail properties
In order to send an email containing the OTP, we need to declare the Spring Boot Starter Mail dependency in the Maven project file as below:
Here, we specify the settings for the outgoing email server (SMTP). If you use Gmail like me, make sure that you enable SMTP in your Gmail account. Of course you can use any valid SMTP configuration, e.g. email account of your own server.
3. Update Service Class
Next, for the business/service class, we need to implement the following additional methods:
@Service
@Transactional
public class CustomerServices {

	@Autowired CustomerRepository customerRepo;

	@Autowired CountryRepository countryRepo;

	@Autowired JavaMailSender mailSender;

	@Autowired PasswordEncoder passwordEncoder;


	public void generateOneTimePassword(Customer customer) {

	}

	public void sendOTPEmail(Customer customer, String OTP) {

	}

	public void clearOTP(Customer customer) {
	}
}
The first method is used to generate one-time password:
As you can see, it generates a random String of 8-character length as the OTP, using the RandomString utility class from this package:
import net.bytebuddy.utility.RandomString;
The ByteBuddy library is used by Spring Boot by default so you don’t have to add new dependency for that. You can also choose to use Apache Commons instead.Then it uses the configured password encoder to generate a hash of the OTP, so the OTP itself is not stored the database – just the hash value. And then, you can see it persists the user details with new value for OTP and OTP requested time, and finally send an email to the user.The second method is for sending an email that contains the OTP to the user:
public void sendOTPEmail(Customer customer, String OTP)
		throws UnsupportedEncodingException, MessagingException {
	MimeMessage message = mailSender.createMimeMessage();
	MimeMessageHelper helper = new MimeMessageHelper(message);

	helper.setFrom("contact@shopme.com", "Shopme Support");
	helper.setTo(customer.getEmail());

	String subject = "Here's your One Time Password (OTP) - Expire in 5 minutes!";

	String content = "<p>Hello " + customer.getFirstName() + "</p>"
			+ "<p>For security reason, you're required to use the following "
			+ "One Time Password to login:</p>"
			+ "<p><b>" + OTP + "</b></p>"
			+ "<br>"
			+ "<p>Note: this OTP is set to expire in 5 minutes.</p>";

	helper.setSubject(subject);

	helper.setText(content, true);

	mailSender.send(message);
}
This method uses Spring Mail to send an HTML email to the user’s email which is captured from the login form.And the last method is used to clear OTP request status upon successful login of the user.
public void clearOTP(Customer customer) {
	customer.setOneTimePassword(null);
	customer.setOtpRequestedTime(null);
	customerRepo.save(customer);
}
These business methods will be invoked by the controller and handler classes described in the sections below.
4. Update UserDetails Class
When using Spring Security, it requires to create a class that is of type UserDetails to represent the authentication object. And update the getPassword() method as follows:
public class CustomerUserDetails implements UserDetails {

	private Customer customer;

	public CustomerUserDetails(Customer customer) {
		this.customer = customer;
	}


	@Override
	public String getPassword() {
		if (customer.isOTPRequired()) {
			return customer.getOneTimePassword();
		}

		return customer.getPassword();
	}
}
You know, Spring Security will invoke the getPassword() method upon authentication, so it will check if OTP is required for the given user then it returns the one-time password instead of the normal one.
5. Update Spring Security Configuration Class
Next, you need to update the Spring security configuration class as below:
Note that here I show only the code that needs to be updated. It is configured to use a before authentication manager, authentication success handler and authentication failure hander – which are all described in the next sections.
6. Implement Before Authentication Filter
We need to check if a login request is suspicious or not, so we need to code a custom Spring filter that will be executed before the authentication takes place.So create the BeforeAuthenticationFilterclass with the following basic code:
@Component
public class BeforeAuthenticationFilter
		extends UsernamePasswordAuthenticationFilter {

	@Autowired
	private CustomerServices customerService;

	@Autowired
	public void setAuthenticationManager(AuthenticationManager authManager) {
		super.setAuthenticationManager(authManager);
	}

	@Autowired
	@Override
	public void setAuthenticationFailureHandler(
			AuthenticationFailureHandler failureHandler) {
		super.setAuthenticationFailureHandler(failureHandler);
	}

	@Autowired
	@Override
	public void setAuthenticationSuccessHandler(
			AuthenticationSuccessHandler successHandler) {
		super.setAuthenticationSuccessHandler(successHandler);
	}

	public BeforeAuthenticationFilter() {
		setUsernameParameter("email");
		super.setRequiresAuthenticationRequestMatcher(
				new AntPathRequestMatcher("/login", "POST"));
	}

	@Override
	public Authentication attemptAuthentication(
			HttpServletRequest request, HttpServletResponse response)
					throws AuthenticationException {
		// Implement later...
	}

	private float getGoogleRecaptchaScore() {
		// call Google RECAPTHA API…
	}

}
The attemptAuthentication() method will be invoked by Spring Security just before the user login so we can write code that checks for suspicious request and generates OTP in this method, as follows:
Note that in the user business class, you should implement a method that finds a user based on email – the email is read from the login page.If OTP is required (set by previous login attempt), it proceeds the authentication normally (the user must enter OTP). Else it gets the spam score returned by Google RECAPTCHA API for the current request. If the score is less than 0.5 (a threshold recommended by Google), that means the request is very likely made by a robot – so it generates an OTP and sends it to the user’s email – for security reason.For testing purpose, we write this method:
In production, you must call the actual Google RECAPTCHA v3 API to get the spam score of the current request. Or you may use a different condition that triggers OTP email process. Or you always want to use OTP email – depending on your actual application requirements.Also note that the exceptions thrown in the attemptAuthentication() method will be caught by Spring Security and error message is displayed in the login page.Read this article to learn more about before authentication filter in Spring.
7. Implement Authentication Failure Handler
We need to setup an authentication failure handler in order to add a couple of query parameters to the login page: otp=true indicates the login using OTP, and email to show the user’s email in the login page. So create the LoginFailureHandler class with the following code:
The onAuthenticationFailure() method is invoked by Spring Security when an exception is thrown in the authentication process – see the exception thrown in the before authentication filter?Check this article to learn more about Spring Authentication failure hander.
8. Update Login page
Next, we need to update the login page to display appropriate message when OTP is required, as follows:
<div>
	<h2>Customer Login</h2>
</div>

<div th:if="${param.error}">
	<p class="text-danger"
		th:utext="${session.SPRING_SECURITY_LAST_EXCEPTION.message}">Error message</p>
</div>
<div th:if="${param.otp}">
	<p class="text-danger">
		For security reason, we've sent an One-Time-Password (OTP)
		to your email [[${param.email}]]<br/>
		Kindly check your email and use the provided OTP to login.<br>
		Note: The OTP will expire after 5 minutes.
	</p>
</div>
<div th:if="${param.logout}">
	<p class="text-warning">You have been logged out.</p>
</div>

<div th:if="${message != null}">
	<p class="text-primary">[[${message}]]</p>
</div>

<form th:action="@{/login}" method="post" style="max-width: 350px; margin: 0 auto;">
<div class="border border-secondary rounded p-3">
	<div>
		<p>
			<input type="email" name="email" class="form-control"
				placeholder="E-mail" th:value="${param.email}" required autofocus/>
		</p>
		<p>
			<input type="password" name="password" class="form-control"
				th:placeholder="${param.otp != null ? 'Your One Time Password' : 'Password'}" required />
		</p>
		<p class="text-center">
			<input type="submit" value="Login" class="btn btn-primary" />
		</p>
	</div>
</div>
</form>
Here you can see, we use Thymeleaf with HTML 5 and Bootstrap. We display the appropriate messages and placeholders in text fields based on the presence of the query parameters otp and email, which are set by the login failure handler above.To learn more about custom login page, refer to this article.
9. Implement Authentication Success Handler
Next, we need to code an authentication success handler class in order to clear OTP status upon successful login, as follows:
The onAuthenticationSuccess() method is invoked by Spring Security right after the user has logged in successfully. So in this callback method, we clear the OTP status if it was set before.For more about Spring authentication success handler, read this article.
10. Test OTP Email function
Run the Spring Boot application and navigate to the login page. Try to login (with correct credentials or not) and you would see the following screen:Check email and you would see an email that looks like this:Now enter the OTP in the email to login again, you should be able to login successfully. Also check the database for the updates of the columns one_time_password and otp_requested_time.That’s an example of implementing OTP email function for an existing Spring Boot application. I hope you will find this tutorial as a good reference to implement your own OTP email function. To see the coding in action, I recommend you to watch the following video:
Nam Ha Minh is certified Java programmer (SCJP and SCWCD). He began programming with Java back in the days of Java 1.4 and has been passionate about it ever since. You can connect with him on Facebook and watch his Java videos on YouTube.
Hi Alberto. No, I don't have GitHub repo for this article. If you want to learn the full development and access the full code, enroll in my course at www.udemy.com/.../spring-boot-e-commerce-ultimate
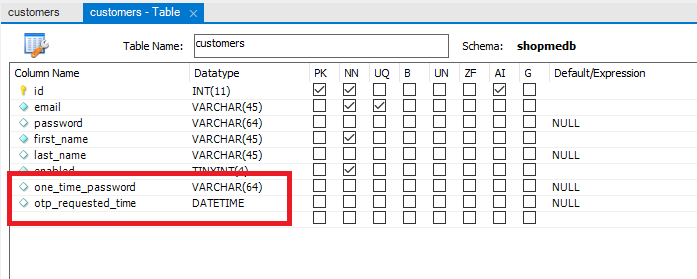 The two new columns are one_time_password that stores the hash of the generated random password (using BCrypt password encoder) and otp_requested_time that stores the time when the OTP is generated – it will be used to check the OTP expiration.Then update the corresponding entity class as follows:
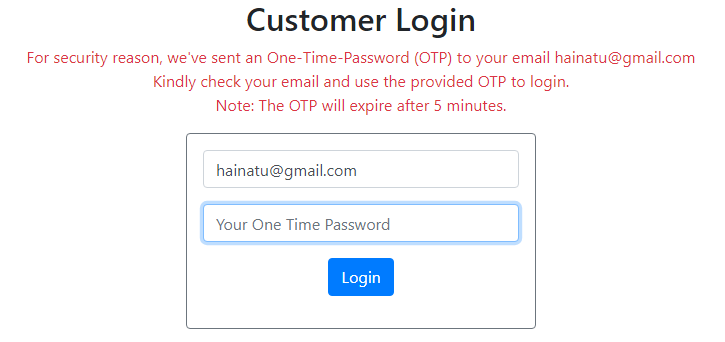 Check email and you would see an email that looks like this:
 Now enter the OTP in the email to login again, you should be able to login successfully. Also check the database for the updates of the columns one_time_password and otp_requested_time.That’s an example of implementing OTP email function for an existing Spring Boot application. I hope you will find this tutorial as a good reference to implement your own OTP email function. To see the coding in action, I recommend you to watch the following video:
  Nam Ha Minh is certified Java programmer (SCJP and SCWCD). He began programming with Java back in the days of Java 1.4 and has been passionate about it ever since. You can connect with him on Facebook and watch his Java videos on YouTube.
Comments
No, I don't have GitHub repo for this article.
If you want to learn the full development and access the full code, enroll in my course at www.udemy.com/.../spring-boot-e-commerce-ultimate